Instagram was introduced as a social networking app with photo-sharing capability. Fast forward to 2023, Instagram has evolved as a powerful business marketing tool with incredible features that allow sharing content in multiple formats, such as Reels and Stories.
As per the latest company data:
- Instagram has over 1.2 billion active users globally
- 50% of users leverage it to discover new brands and products
- 90% of its users follow at least one business account
All these statistics point to the fact that a strong presence on Instagram can help businesses drive high engagement and conversions, whether the business is a startup or well established. Over 2 million brands are already leveraging Instagram for business promotion, and it’s high time you jump on the bandwagon.
Although video content is gaining momentum on Instagram, posting stellar photos with value propositions in the captions can help achieve better business outcomes.
Kelly Hendrickson, social media marketing manager at HubSpot, explains: “Organically, images can reach as many as 2x more people. This isn’t to say that video couldn’t work for you, but Instagram was always designed as an image-first platform.”
Posting the perfect Instagram shot can thus boost your social engagement. In this post, we will share seven tips to snap and edit outstanding photos for Instagram.
How to snap and edit stunning Instagram photos
1. Review your camera settings
Optimized camera settings are key to quality and Instagram-worthy pictures. So, before anything else, review and adjust your camera settings.
Nowadays, most phone cameras offer powerful functionalities, such as high megapixel resolution, HDR, autofocus, and more. The tricky part is understanding and leveraging these features to get the best outcomes.
Here are a few tips to consider.
High dynamic range (HDR) enables users to capture a scene without losing details in dark and bright areas. Notice the below-shared image to understand how HDR provides a visual treat by adding extensive detail.
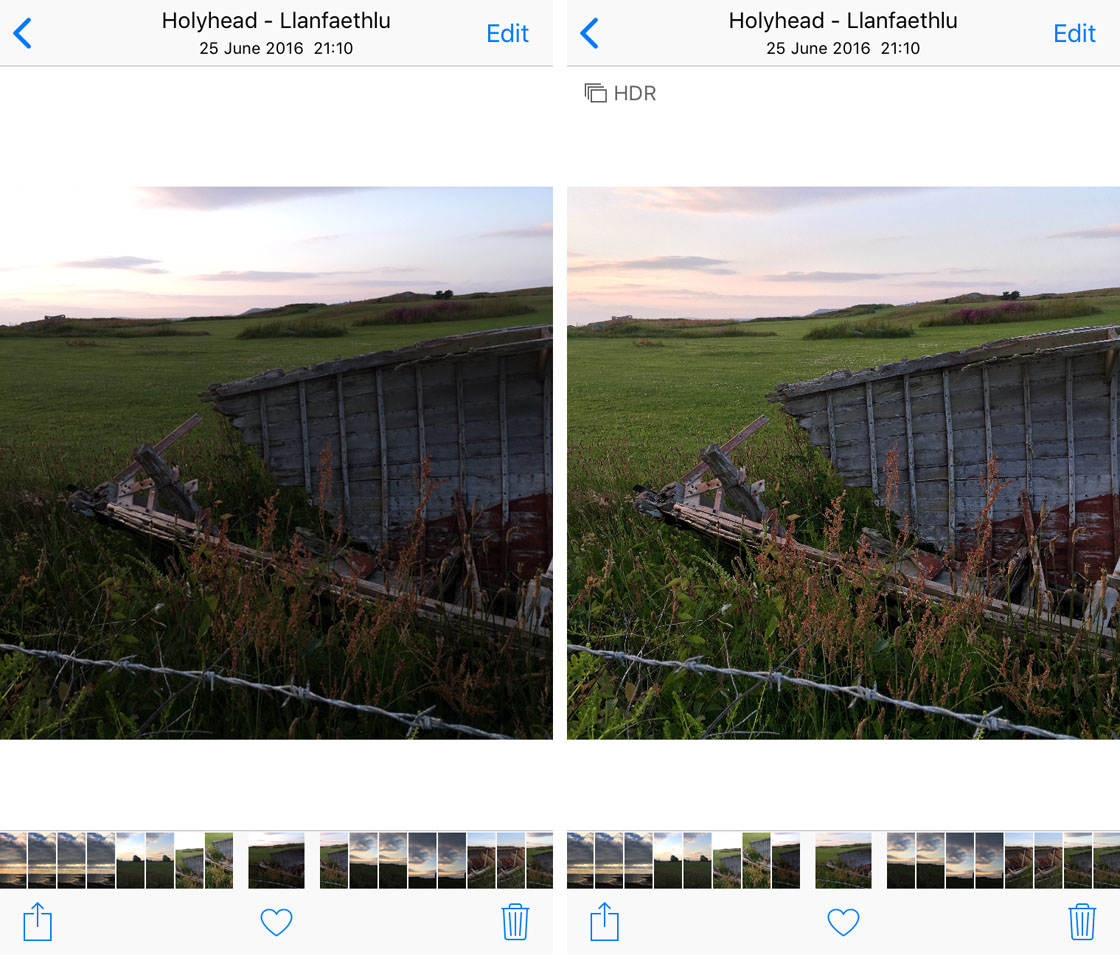
Source
Pro tip: Don’t use the HDR feature for every picture you snap, or else you will end up with unnatural and off-looking pictures. Use it only when you face trouble balancing a picture’s brightness.
Check out how Airbnb, a leader in the travel industry, leverages this tactic. Observe their image reflecting dark shadows and bright highlights exceptionally well.
Source
With portrait mode, you get a picture with blurred background and sharp focus on the subject as shown in the example below.
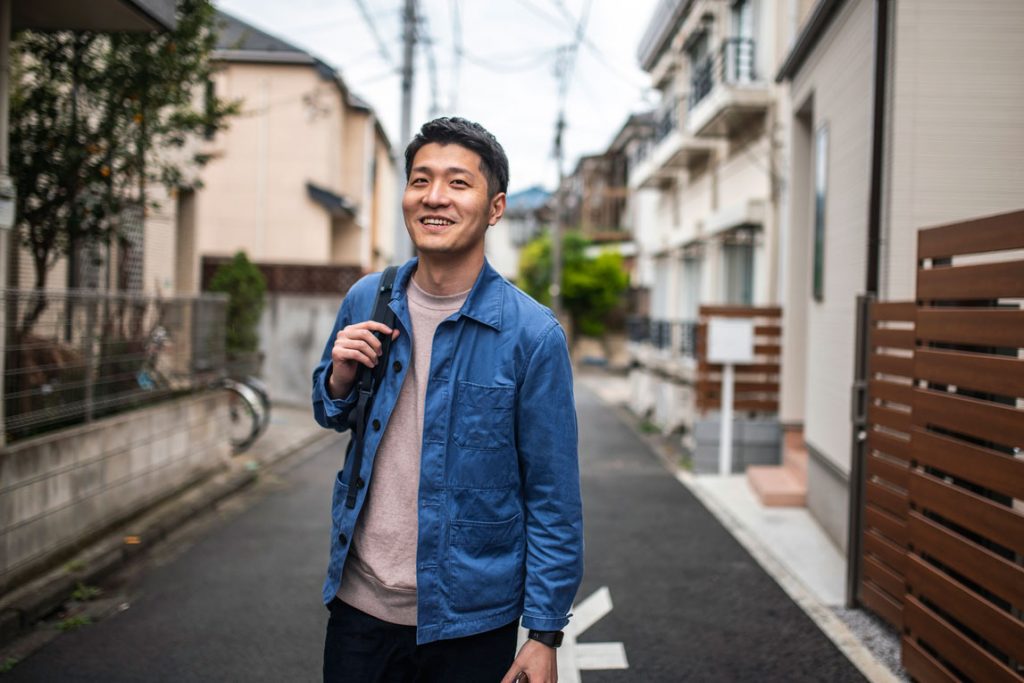
Source
Pro tip: Use portrait mode to highlight something, specifically your product, in a photo.
See the recently posted image by M.A.C Cosmetics. Observe how the beauty brand highlights its products (lipsticks) to grab user eyeballs.
Source
Also called continuous mode, burst mode allows users to capture a moving subject.
Here’s an example reflecting multiple images shot in burst mode.
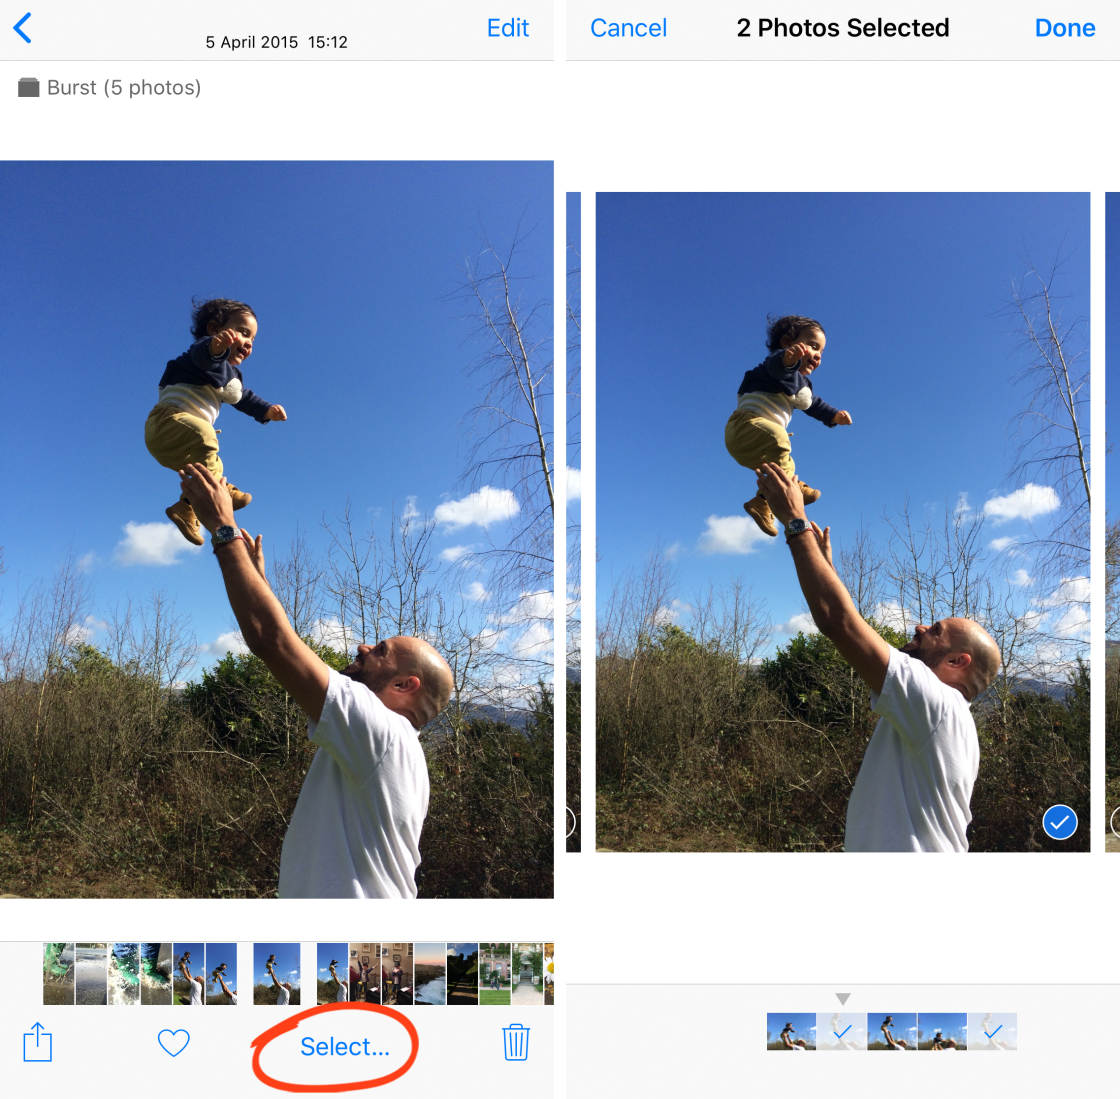
Source
Pro tip: Use this mode to snap multiple high-speed pictures. This way, you will have an array of images to choose from. Once you’ve finished shooting, select the perfect shot to post.
See how Nike, one of the leading global footwear brands, effortlessly uses this tactic.
Source
2. Get your composition right
Photo composition is how a photographer organizes visual elements within their frame. A good composition provides a solid structure to subjects or art pieces and creates a visually appealing view that highlights the subject while balancing the other elements in the scene.
How do you get the photo composition on point?
Follow the golden rule of photography called the “rule of thirds.” It requires breaking down the image into three sections and placing the subject in the right or left third to achieve a well-composed shot.
For instance, notice how the following image is broken into three portions to get nine pieces and four gridlines. The subject (tree) is kept on the extreme right, leaving the left slots.
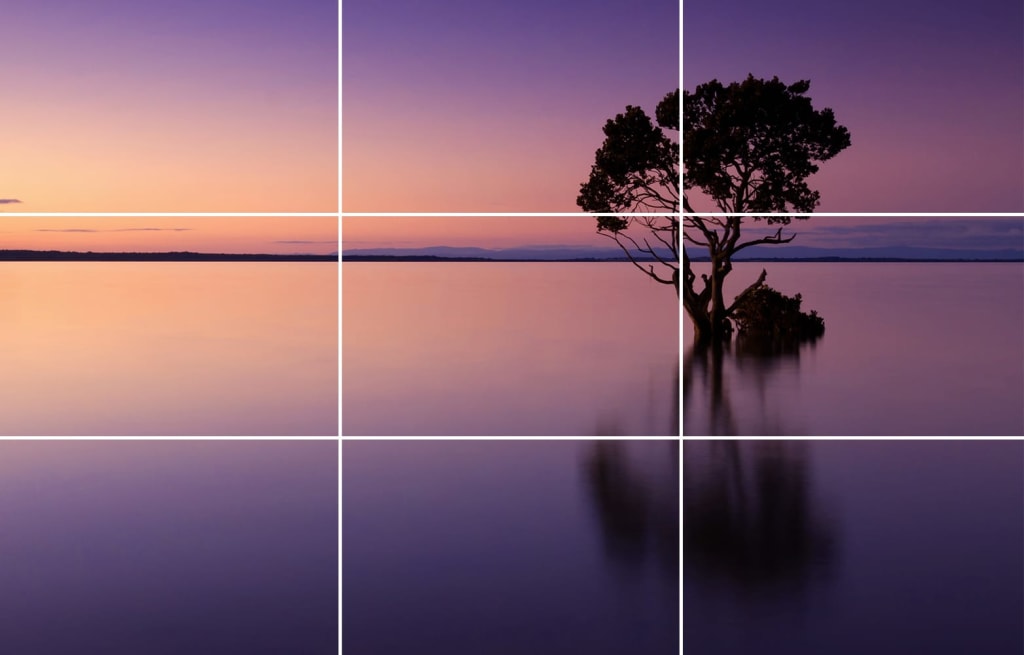
Source
Observe how Valley Buds Flower Farm, organic veggies and flowers shop, follow this practice to level up its Instagram game. See how they have arranged the flowers in the lower-right area to get the composition right.
Source
Pro tip: Android and iPhone cameras offer the provision to create a grid. Check your camera settings and select the grid lines while snapping the picture.
3. Ensure adequate lighting and exposure
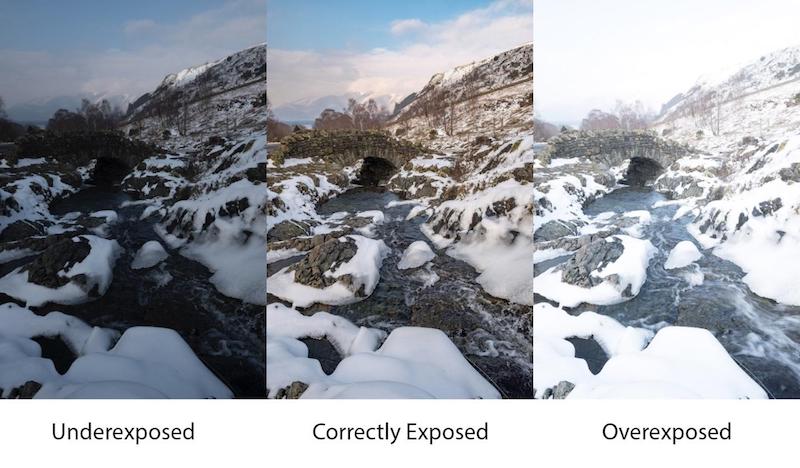
Camera exposure signifies the amount of light that reaches the sensor while taking the snapshot. The more you expose the camera sensor to light, the brighter your photo will be, leading to overexposure. The lesser the light the darker the picture will be, resulting in underexposure.
In both instances, the photograph loses its original details. See the below-shared example to understand the difference.
Source
So, ensuring the correct exposure is vital as it can make a remarkable difference in how the photographs turn out. The following Instagram post by Elle Decor, a home and decoration magazine, is proof of it.
Source
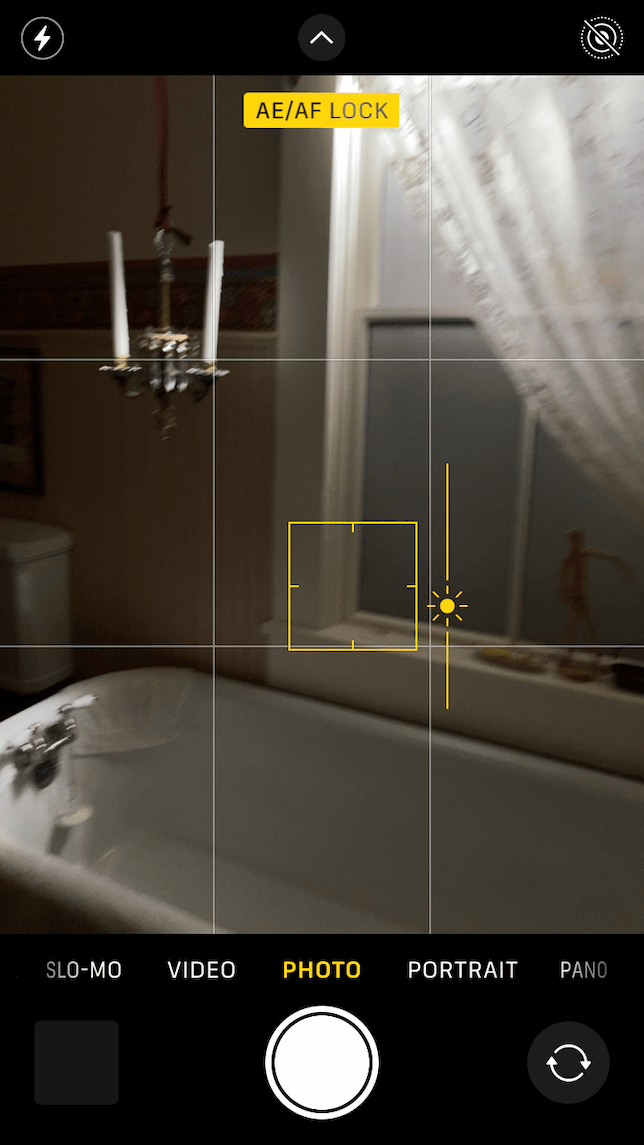
Here’s the hack to get the perfect shot: Just tap your screen on lighter and darker areas of the shot to balance the exposure manually. You will see a “sun” icon with a vertical scale. Move your finger up and down the scale to adjust the light.
Source
4. Add layers and filters
So you’ve now got this fantastic snap that’s Instagram-worthy. Not yet! There’s a lot more you can do to boost the image’s quality and attractiveness. You can edit the photo by adding fun effects, layers, and filters, to ramp up your Instagram engagement. Although Instagram offers an in-built photo editor, its capabilities are limited.
That’s where you need state-of-the-art picture editing tools to share photographs that look like masterpieces. With a plethora of photo editors available today, however, choosing the best app to download can be draining. You’re not sure whether the photo editor can work well on iPhone or Android, what app is easiest to use, and you are clueless about editing features to look for.
Photoleap is an all-in-one, AI-powered photo editing solution for your needs.
Developed by Lightricks, the company behind photo and video editing apps like Facetune and Videoleap, this AI-powered picture editor is available for mobile. Its instant photo edit features allow you to add filters, special effects, animate images, and more.
Here’s how you can leverage this intuitive, user-friendly app to add a layer to your image: Open a new project and click the (+) icon in the top right corner to add a picture. Click the same icon to select another snap and create a new layer.
Source
The editing tools will show up for each layer you build in your picture. This allows you to edit the images individually and to blend them together in creative ways.
For instance, if you want to edit tshe first image reflecting a man walking in the dark, tap on it to edit. You can add special effects or filters to alter its appearance. However, this won’t affect the second image depicting the road.
Pro tip: If snapping a picture seems time-consuming, leverage Photoleap’s Text-to-Image AI generator. This feature enables users to create stunning photos by writing a description. The AI-powered tool turns ideas into perfect illustrations. You can generate thousands of images for your Instagram with a few clicks.
Play around with the versatile editing features to create unique photographs. Once you’re happy with the outcome, save the picture and post it to your Instagram.
5. Remove unwanted background objects
Sometimes distracting elements in the background can pull down the overall appeal of the photograph. It shifts the audience’s focus from the subject and minimizes the engagement quotient.

Source
On the other hand, a clear or transparent background can help you grab the audience’s attention by highlighting your subject.
If you don’t like your picture background and it’s too late to reshoot, count on the remove.bg app to do the trick. This AI-based background remover app offers simple drag-and-drop functionality by which you can select the picture to edit. It detects the background and foreground and works its magic within five seconds.
You can remove the background entirely, make it transparent, or select from their stellar design templates to replace it with something that fits your theme. The tool works well on both mobile and the web.
6. Adjust the white balance and sharpness
The phone camera can reproduce colors as they appear in real life. However, sometimes, it may fail to analyze the scene to achieve the desired results, making the colors in the picture appear too warm or cold. Often, you can spot this problem in areas that should be white.
For instance, see how the snow in the below-shared photograph appears blue. That’s when maintaining a white balance can help. It allows users to get rid of the color cast and retain the natural appearance of the image.

Source
Another crucial thing to focus on while editing a picture is its sharpness, which depicts the level of detail in the picture. Technically, it refers to the contrast or acuity between the edges of objects, as shown in the following example.
Source
Sharpness can vary depending on several factors, such as the lens, shooting technique, and viewing distance.
Let’s Enhance is the best image editing tool offering drag-and-drop functionalities to transform blurred, low-quality pictures into beautiful Insta-ready images within minutes. With this AI-powered tool, you can enhance the lighting and colors of photos to meet pixel requirements. Its “batch processing” feature lets you sharpen and color-correct 20 visual assets at once.
What’s more, Let’s Enhance has a tab for presets, which helps creators edit pictures to suit industry standards. For instance, select the real estate option in the presets if you are a real estate company. The advanced AI-based algorithm of this image editor will integrate modern real estate image standards and maximize the quality of your photo.
7. Maintain an overall profile aesthetic
Your profile aesthetic is the first thing that visitors notice while checking your Instagram account. A unique and pleasing Instagram aesthetic with layout and colors aligning with your brand style can enhance your recognition. It can capture the target audience’s attention as they scroll through the feed and encourage them to take action.
Before posting a picture, ask yourself:
- Who is your target audience?
- What business value are you trying to convey?
- Do the colors, textures, quotes, or patterns match your business identity?
Analyzing these questions every time you post can help create an appealing feed.
Notice how Unico Nutrition, an health and wellness supplement brand, follows this practice to make its aesthetics stand out.
Source
Unico Nutrition knows:
- Their target audience comprises active and energetic youngsters.
- They want to convey that their nutrition supplement is the best in the market.
- Their creative and bright Instagram aesthetic reflects their unique brand identity.
No wonder, Unico Nutrition has achieved a massive following on Instagram with 74,000 followers.
Wrapping up
Posting stellar visuals is the key to being successful on Instagram. Thankfully, you don’t need to buy an expensive photography kit or be a pro photographer to snap quality pictures for your feed.
The shared photography tips and tricks and the image editing tools can help you create beautiful visuals to boost your Instagram engagement. So, leverage them to get on top of your Instagram game and gain a competitive edge.


